Saturday, September 12, 2015

Learn MVC Architecture with Simple Java Example

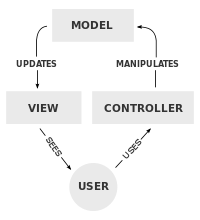
Model–view–controller (MVC) is a software architectural pattern for implementing user interfaces. It divides a given software application into three interconnected parts, so as to separate internal representations of information from the ways that information is presented to or accepted from the user.


Now I take simple java example to understand MVC Architecture.

Go to Netbeans and create New Java Application Project.

Create New Java Class Called "Model.java".I create Apple model inside it and create constructors and two methods to incrementApple and getvalueApple.


So model represents an application’s data and contains the logic for accessing and manipulating that data.

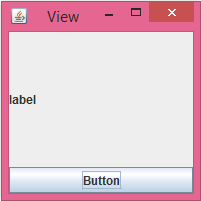
Then create New Java Class Called "View.java".I create simple JFrame and implement JButton and Jlabel inside it.You can see code and Output below.


so the presentation semantics are encapsulated within the view.

Then Controller is most important part.I want to do when i press this button in View Apple value should increment by 1 and display in label.so that logic should implement inside controller.It connect Model and View.


Create ActionListner and with in that, create method LinkBandL( ) to increment apple value and display in label.


so The controller is responsible for intercepting and translating user input into actions to be performed by the model.

then Create Main class to Run this Application


final Output: 


 Click Button Apple value increment by 1 and display in label. 


Friday, September 11, 2015

How to connect Android Application with Microsoft SQL Database using PHP and retrieve data. (Section 2)

In this section I'm create android app to get information from URL.

I'm using android studio to create new project.
File --> New project -->


Give Activity name and Layout name and click Finish.


Add Plain_TextView to .xml layout.


update Activity.java using this.


Update using getid( ) method.

make sure you type correct URL and also  give permission <uses-permission android:name="android.permission.INTERNET" /> in android Manifest.


Wednesday, September 9, 2015

How to connect Android Application with Microsoft SQL Database using PHP and retrieve data. (Section 1)

Section 1 I’ll discussed how to create odbc connection and write php code to get information from database to URL.

Part I: Create an ODBC connection.

Start MSSQL server Management studio.

Select SQL Server Authentication, Login Username and Password. Click Connect.


Left Side panel you can see Databases you created already.

Open the Administrative Tools icon in your Control Panel.


Double-click on the Data Sources (ODBC) icon inside.


Choose the System DSN tab and Click on Add in the System DSN tab.


Select the SQL Server Driver. Click Finish.


In the next screen, give Data Source Name. (This is very important. You should remember this) and select your sql server.


Select second radio button. Give Login ID and Password (It should be same as your SQL server Login ID and Password)

If you connect with MSSQL server using Windows NT authentication, Select first radio button. Then you don’t need to give any username or password.


 Click Next and choose Database.


Click Next and then Finish.
Then it appears Test Data source window.


If you successfully connect, you will able to see this prompt.


----------------------------------------------------------------------------------------------------

Part II: write PHP code to retrieve information from MSSQL Server

Start wamp server. Go to www folder and create new folder and rename it.create .php file inside that folder and write below code into it.

The odbc_connect() function is used to connect to an ODBC data sourceThe function takes four parameters: the data source name, username, password, and an optional cursor type.
The odbc_exec() function is used to execute an SQL statement.
The following example creates a connection to a DSN called “firstsql”, with my username and password.and also I wrote sql query to select information from Dept table which located in AndroidAppDB database.
Json encode is used to encode data to Jason array.

After that run http://localhost:81/my%20project/first.php.You will able to see this.


Next section I’ll create android app to get information from this URL. To be continuing…

Tuesday, September 8, 2015

How to create java servlet application to connect MySQL database and retrieve information (Section 2)

In this section we continue our work...

Part III: Create Servlet Application to insert data into MySQl database.

Create New Web application
Fileànew ProjectàSelect Catogary(Java Web) and Project(Web Application) Click Next


Give Project Name and click Next.

Select Apache Server and Click Finish (No need to go to Frameworks).

Then you can see your project in left side panel. Expand it go to Web Pages and click index.html file.


Inside <body> tag write code shows in below.


< a href=”insertrecord.html”>Insert record</a>
Using this command we create link to insertrecord.html file & displayrecord.jsp file with in index.html.

Right Click Sample InsertàNewàHTML create new HTML called insertrecord.html
Right Click Sample InsertàNewàJsp create new Jsp called displayrecord.jsp(Make sure you enter correct html and jsp file name)

Then Run the application and you able to see this page in your Browser.

Click Insert Record Link and you can see this.

Then you need to important thing in project.

Right Click Sample Insert-->New-->Java Class create new Java Class called DatabaseConnection.java
Inside that write this code.


Specially you need to give same jdbc URL (I discussed it in part II) inside getConnection() method.


Then goto insertrecord.html and write thic code inside <body> tag.


You can see I create two text fields and name them as username and password. So when I insert data to that fields that data assign to username and password variables.

Make sure you write action=”InsertData” and method=”Post”. I tell important of it later.
After run insertrecord.html you can see this.


But when you fill it and click submit you will see http Error.


Let’s fix that error.

For that we need Java servlets.

Create Java Servlet.

Right Click Sample Insert-->New-->Servlet create new Servlet called InsertData (This Name should be same as action name in <form> tag insertrecord.html. because when we click submit button that data should pass using POST method into this servlet. POST method is secured than GET method. Because when we send data using POST method that data doesn’t display in URL) and Click Next.
Then click (web.xml) check box and Click Finish.


Inside that servlet generally have three methods called processRequest, doGet, doPost, getServletInfo


We Usually write our codes in processRequest( )method. So write this code inside it.


First we get submit our input and post it them into InsertData servlet. Then we need to expand them and same them into variables.
So using request.getParameter( ) we can get those details into String variables(those variables should be same as database table attributes).

Then write Sql query to insert data into MySQL database and execute it.

Then We Finish.

Save and run application. Enter details and click submit button.


Finally go to databases àExecute command and you can see successfully our details goto MySQL database.


Monday, September 7, 2015

How to create java servlet application to connect MySQL database and insert information (Section 1)

Frist section I mention how to configure netbeans with apache server and connect MySQL with Netbeans.

Part I: download netbeans and setup apache server

Go to netbeans URL and download Java EE package


When you install IDE It appear this kind of screen, make sure you click Apache Tomcat 8.0.15 check box and continue.


After complete installation you can open Netbeans IDE.
Go to WindowàServices and you can see Services tab in left side corner.


Expand Servers and you can see Apache Tomcat and GlassFish server inside it.
You can start server,
Right Click Apache Tomcat or TomEEàStart

-------------------------------------------------------------------------------------------------------

If you don’t see any server in there you need to download Apache server and setup in netbeans.
Download Apache Tomcat 8.0


Extract it into C drive (you can use any place you want).
Again Go to NetbeansàServicesàRight Click ServeràAdd Server


Select Apache Tomcat or TomEE and Click Next.


Make sure you give correct path to both location and click Finish.
Then you can see Apache Tomcat or TomEE server in servers list. Right Click it and Start server.
--------------------------------------------------------------------------------------------------------
Still you have Errors in your server you need to
Right Click Apache Tomcat or TomEE àEdit server.xml and change port numbers in line 69, 71, 91 to something else.

Part II: How to connect Netbeans with MySQL Databases

Create Database Using MySQL. (I’ve done database creation in my previous lesson. Make sure you run wamp server)
Again go to NetbeansàServicesàDatabasesàDrivers
Expand it and Right Click MySQL (Connector/J driver) and Click Connect Using…


Put correct Host, Port, Database Name, Username and Password and Click Finish.


Then you can see jdbc URL like show in below picture.


We are successfully connecting MySQL database with Netbeans.

You can check connection Right Click jdbc:mysql://.. àExecute Command.
Write SQL query to check connection. I write select query to retrieve table information and result appear in bottom of page as shown here.


-----------------------------------------------------------------------------------------------------
Sometimes ServicesàDatabasesàDriversà MySQL(Connector/J driver) Not Shown. So you need to install that driver to your computer. You can use this link.


Next Section I discuss about simple application using Java Servlet how to insert data to MySQL database...To be Continue